In days gone by people made things, we made things out of what we had. Copper when we had copper and pewter when we invented pewter, some of us however never moved on and continue to make things using copper and pewter, despite it being hard or maybe because it is.
So on with the motley and on with how I made that "Raven Bowl" all the stages, all the ways, so you can make one too, or just marvel at why anyone would want to.
I was wandering round Truro one day, when I saw a raven. Them things are huge! like a dark black buzzard with a "I could eat you" look in its eye. So I was inspired to think of a design to incorporate that bird in a bowl. But I get ahead of myself.
Here are the raw materials, Big Hammer (rubber and rounded off one end) one medium hammer and a small hammer. A few steel punches, made by shaping some plain steel rods and one proper chisel but with the end rounded off a bit so it doesn't cut right through the metal. A "sharpie" pen or rather a cheap look alike from Asda supermarket. I use a sand bag too, leather bag filled with sand, the leather was a bit out of a leather jacket bought from a charity shop, the sand, is just building sand. Not forgetting the shiny shiny disk of pewter. 300mm across and 1mm thick (or 12inches across in "english" as the chap at http://pewtersheet.co.uk/ said).. now for the hitting it with hammers!

Ok so that is one pass of the "big 'ammer"
I placed it on the sand bag revolved it as i hit it, thud thud thud. As you can see this crinkles the edge in a distressing way, but that is all part of the plan. What causes the edge to crinkle is the more central bit stretching and the edge complains by trying to curl up. There are in my experience two ways to make a bowl, one is hammer it and stretch it all or hammer it and stretch the centre and shrink the edge. Which seems impossible that metal shrinks when hit, but it can be done.
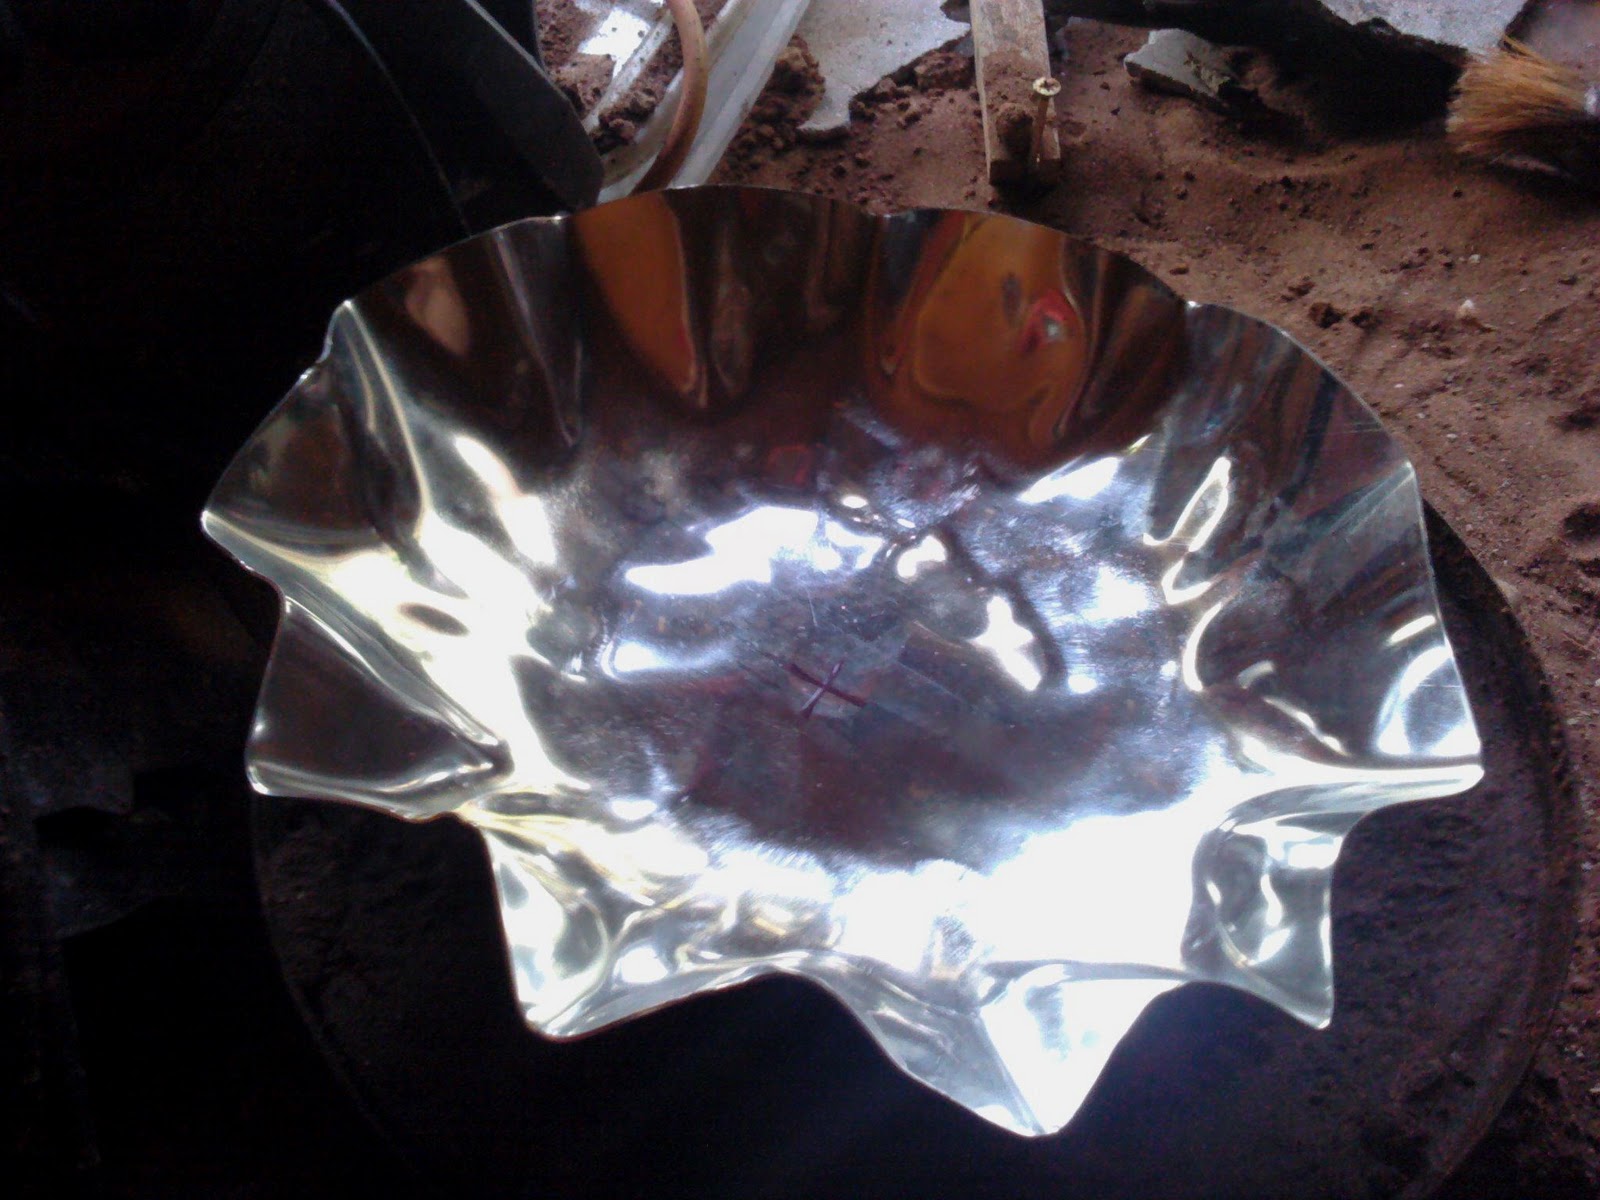
So here it is after a pass with the "big 'ammer" round the crinkles, on top of a big bit of wood as a backing. You can't see much movement but its just slightly dished now. The crinkles are forced to collapse, each time they collapse they tighten just a little and the rim shrinks. While the centre is pushed down.
Now you see more movement and more crinkles. This is after about ten passes and the pewter is getting soft. Odd metal it's mainly tin and as you work it it softens as its atoms suffer under the hammer. cCopper work hardens and needs heat treating to soften it, but pewter starts to move more the more you hit it, if left to rest it tightens up noticeably.
That's coming along nicely, after a few passes and too many hammer blows for my poor arm!
"Sinking" nicely now it rests on an other handy bit of workshop equipment the "rusty old bit of railway track" Ok Anvils are expensive and I don't have one, I do have this odd yard of track to hammer things on. Its big, heavy and just fine for what I need. (Actually it's an historic bit of track, I got it from a fiends wood pile, the wood was salvaged from Falmouth docks when one quay burned down some years ago. It's American track put on the quay when it was built for loading D-Day invasion ships)
My poor aching hand! Here I have hammered the bowl using the small ball ended hammer, evening out the texture all over with many hundreds of hits, with the bowl held on the railway track so the metal is pinched between hard iron. It gives a pleasing and traditional dimpled effect all over. Ever inch is covered, every dashed inch!. This also stretches the metal deeper. A quick few passes with the "big 'ammer" also even it out so its more bowl shaped again.
After seeing the Raven in Truro I thought about how to incorporate a Raven into a bowl. Three seems a good number for a design, and very traditional in Celtic designs so I worked up a design. I draw it on free hand so each bird is an individual with a little character of its own. (also drawing the design on paper and trying to transfer that to a 3-d object is diabolically hard!) So it's a one off, never to be reproduced quite the same way again...I'm just not that good a metal hammerer!

Here's a secret of arcane metal working. The metal needs "backing up" If you hit it now unsupported it will dent in a most disappointing way. So it needs something yeilding but stiff behind it. Tradition dictates a fiendish mix of pitch (of balkan and expensive origin) and plaster. I can't find that anywhere round here, so I use either wet sand, sinking the bowl into a wok of damp sand, or in this case the more crisp method of moulding warmed (in the kitchen oven, but do take proper precautions, do it when the wife or significant other is out and use a very low heat) Plasticine modelling putty. I just pushed it tight over the back of the bowl, and laying it in the wok on the sand started to hammer. The two chisels are a small one for the tighter turns in the design and the bigger one for smoothly dragging along the more flowing lines. Notice also my only "proper" tool. A Repousse or chaseing hammer, posh ah! Its small and the oddly shaped handle lets my hand rest a bit, and it cost a fiver, but it's not strictly necessary. I use with when I need a lighter touch.

Here it is tuned over and refilled with plasticine. You can see the design showing from the front chiselling. I usually wash it with a pan scourer at this stage to make the raised bits stand out brighter so I can see them. Now I set to with some more punches, this time domed ones, more or less just rounded off bits of steel rod.
Punched down supported on a bed of plasticine and wet sand in a wok what more could a new bowl need ah. I have to be careful not to punch too hard. It doesn't take much to raise a design but too deep is hard to rescue, even with hammers.
Striped off it now looks like this. A low relief. At this stage I washed it with Brillo pads (wire wool pan scourers) and to get the Sharpie ink off, which is incredibly persistent, I resorted to a brass bristled pan brush (a handy tool sold in Tescos). So it's all fairly bright and far too shiny. Now I've decided it just might look good I embarked on the nerve wreaking process of rolling the edge. The bowl shape is fairly strong but with a plain edge its floppy and very bendable if dropped. So it's tap tap the edge and roll it over as neat as I can, in this case over a bit of copper wire to maintain its shape. Its a horrible process and a few out of place taps can mean disaster, so I wouldn't do it if it wasn't necessary.

Another top tip here. Modern pewter is lead free. It used to be Tin with a bit of lead and was used as a sort of 18 century plastic they made everything out of it from plates to syringes. Lucky for them the lead poisoning was just a sideshow from the average misery of life so it didn't matter. In more enlightened times we use lead free pewter, which is 90% tin, a touch
of antimony and copper which has the advantage of not making you dead, or at least we don't know yet (I joke, it's certified food safe). However it has one disadvantage. When I first made a pewter bowl two people saw it and commented that it was Ok for a bit of Aluminium! This caused me pain, but I had to admit it did look a bit aluminiumy. This new pewter stays shiny, bring back the lead I cried! Until I discovered a magic liquid more usually used on leaded light "came" (those lead bits between the glass in stained glass windows) to make them go black. Painted onto Pewter it sends them dark and authentic looking. I think its dilute nitric acid with a bit of copper sulphate but don't hold me to that, just go get some from a windows shop. In the pic I am painting the watery, slightly green/blue liquid on, notice a bit of sand has got involved too. This I've found helps the liquid wet the surface otherwise it sort of rolls off and goes a bit patchy. I left it in a warm place and it went dark all over.

The trick is now to highlight the birdy bits without diminishing the darkness of the surrounding stuff. I did this at first using a powder called "Bar Keeps Friend" which is meant for steel and copper surfaces, its abrasive and removes the patina well when applied with a cloth covered damp finger. I wash it off rather than polish it off so its kept in its place. Then i use Brasso wadding ( a fine metal polish on sort of cotton wool wadding) that brings it up a treat.
Last stage now. I apply "renaissance wax" (as recommended and indeed invented by the British Museum) Brush it on with a soft shoe brush and polish it off with a rough cloth, there it is shiny where I wanted it shiny and dull where I wanted it dull... easy...
Warning the wife may want to know where the sand in the sink is coming from and why her baking tray has got bits of plasticine on it.

 Ok so that is one pass of the "big 'ammer"


all good stuff buddy. I wish I had the patience (and typing ability) to be able to make a how too on a lot of my bits of kit.
ReplyDeleteIf i can , anyone can, i cant spell i cant write, i burn myself constantly on hot bits of metal....
ReplyDeletelovely work, eye candy for sure. I enjoy looking at different peoples crafts, I myself work with fused glass, ceramics and greeting cards. There is always room for new pursuits :-) I have had a go at glass blowing too, now that was brilliant but by gosh so hot and really hard, not as easy as it looks. I appreciate glass so much more now I have worked it in so many ways. My Jon loves working with metal on his lathe and makes little steam engines, really intricate work but like your work so fantastic when it is finished.
ReplyDeleteShame you are not so near, we have a lovely big tank sitting in a garage and all the copper pipes, we have not got up the enthusiasm to take it to the scrappies. It was enough lifting it out of the house LOL
Well thanks, maybe its a sign that one of you should take up the hammer! We have a glass blower just a few doors down the street (http://www.malcolm-sutcliffe.co.uk/ that bloke) I've seen him doing glass and i can agree its is jolly hot, in fact at times i've been in my, sadly cold shed, looking over at this studio chimney and its heat haze, and wanted to shin up and install some sort of heat exchanger. Nice guy too when i asked him about where to get powdered glass for enamelling, he gave me a big box of powers he had been given as samples. Your jon sounds skilled, my own attepts at steam power flounder on my "temperament for lack of precision" (as a friend put it.) . My son Harry instructed me to make him a steam engine, but all i came up with was a jam jar jet engine, which to his delight pretty much exploded.
ReplyDeleteYou make beautiful things, Jon. Pleasue to look at them. Thanks.
ReplyDeleteWell, very nice of you to say , thanks...
ReplyDeleteand look at your own work a compliment indeed.. thanks.
ReplyDeleteIm just trying and learningand tryimg again.
ReplyDeleteI made some chasing picth based on bitumen -(asphalt, pitch), rezin, chalk and beeswaks but now waiting and gatering some money for blowpipe or hotairgun to try that miksture out. Professional chasing pitch from shop must be very good to that work but it's to expensive for me. I'd like to try your way with wet sand. Till now i was usin a piece of thik leather. (My english is a little bit poor. I hope i did not missed anythig up, writing to You).
Could You please explain: that must be only wet sand and nothig more?
There are many ways of doing it and no right way. There are many mixtures of pitch too, some soft, some harder for crisper effects. I used wet sand as with pewter its fine , pewter is very soft and softens as you work it. Usually on copper i use plasticine (children's no hardening modelling clay) It provides good support and is reusable. The Newlyn Copper workers (local to me and part of the Arts And Crafts movement of the 19 century) used sheets of lead for a very crisp effect. Usually they didn't hammer form bowls etc but worked designs of fish into flat sheets then fold formed copper vessels.
ReplyDeleteThank You, Jon for these informations. I appreciated. I'll try the plasticine to. Take care!
ReplyDeleteIs this from the maker of the famous Elvis Fish?
ReplyDeletefish of note constructed to the nobility indeed it is I!
ReplyDelete